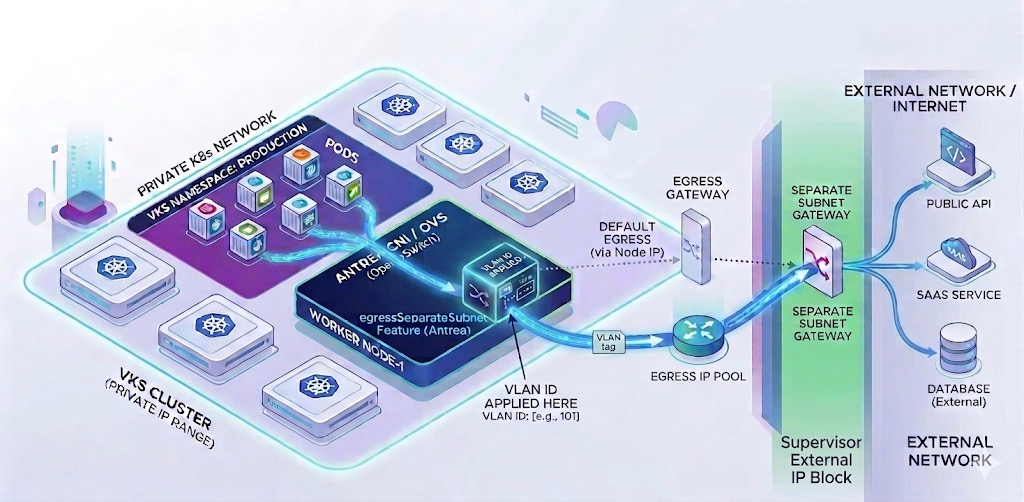
One of the powerful capabilities enabled by the EgressSeparateSubnet feature gate in VKS is the ability to configure dedicated egress paths for your Kubernetes workloads. Rather than sharing a common egress IP with all pods in a cluster, you can assign specific IP addresses to namespaces, giving you granular control over how traffic exits your environment. This is particularly valuable when integrating with external systems that require IP-based access control or when you need clear network segmentation for compliance purposes. In this post, I’ll walk through the complete process of creating a dedicated egress configuration that spans both the Supervisor and your VKS cluster.
Understanding the Architecture
Before diving into the configuration, it’s important to understand how VKS egress works with NSX VPC mode. The architecture involves multiple Custom Resources (CRs) deployed across different contexts:
- Supervisor namespace – Where you define the Subnet and SubnetConnectionBindingMap
- VKS cluster – Where you create the ExternalIPPool, Egress, and namespace-specific configurations
The key to success is understanding that NSX creates VpcSubnets that need to be bound together with a VLAN tag. The Subnet CR in the Supervisor creates the underlying NSX infrastructure, while the SubnetConnectionBindingMap associates it with your VKS cluster’s node network. Once this foundation is in place, you can create ExternalIPPools and Egress rules within your workload cluster to control which pods use which egress IPs.
Prerequisites
Before proceeding, ensure the following are in place:
- VKS cluster deployed with Antrea CNI and NSX integration enabled
- EgressSeparateSubnet feature gate enabled in your AddonConfig
- Access to both the Supervisor namespace and VKS cluster contexts
- Available VLAN ID for the egress subnet binding
- Understanding of your NSX VPC external IP block configuration
Step 1: Create the Subnet in the Supervisor
The first step is creating a Subnet CR in your Supervisor namespace. You have two options: specify a static CIDR or let NSX automatically allocate one from available external IP blocks. I prefer the automatic allocation approach because it eliminates the need to manually verify that your chosen subnet doesn’t overlap with existing resources.
Switch to your Supervisor and the vSphere namespace context where the VKS cluster will live:
$ vcf context use admin-01:wkld-03-proj-02Create the Subnet CR with automatic CIDR allocation:
# sup-subnet-cr.yaml
kind: Subnet
metadata:
  name: vks-02-egress-subnet
spec:
  accessMode: Public
  subnetDHCPConfig:
    mode: DHCPDeactivated
  ipv4SubnetSize: 16
Apply the configuration and verify the allocated addresses:
$ kubectl apply -f sup-subnet-cr.yaml
subnet.nsx.vmware.com/egress-subnet created

$ kubectl get subnets vks-02-egress-subnet -o custom-columns="NAME:.metadata.name,NETWORKADDRESSES:.status.networkAddresses,GATEWAYADDRESSES:.status.gatewayAddresses"
NAME            NETWORKADDRESSES        GATEWAYADDRESSES
egress-subnet   ["192.168.28.0/28"]     ["192.168.28.1"]
Take note of the network addresses and gateway—you’ll need these when creating the ExternalIPPool in your VKS cluster.
Step 2: Identify the Target SubnetSet
Before creating the SubnetConnectionBindingMap, you need to identify which SubnetSet your VKS cluster is using for its node network interfaces. The SubnetSet name follows a specific pattern based on your cluster name.
Find the SubnetSet associated with your VKS cluster:
$ kubectl get vsphereclusters -n wkld-03-proj-02 -o=jsonpath='{range .items[?(@.metadata.ownerReferences[0].name=="vks-02")]}{.metadata.name}{"\n"}{end}'
vks-02-8f4wx
Step 3: Create the SubnetConnectionBindingMap
The SubnetConnectionBindingMap associates your egress Subnet with the VKS cluster’s node network by assigning a VLAN ID. This VLAN tag must be unique within your environment—check existing bindings to avoid conflicts. NOTE: In this example, I’ve already created the binding and you can see the VLAN used (200). Make sure to create a unique VLAN mapping if one already exists.
$ kubectl get SubnetConnectionBindingMap -A
NAMESPACE         NAME                    NAME                    SUBNET                 TARGETSUBNET   TARGETSUBNETSET   VLANTRAFFICTAG
wkld-03-proj-02   vks-02-egress-binding   vks-02-egress-binding   vks-02-egress-subnet                  vks-02-8f4wx      200
Create the binding with a unique VLAN ID:
# sup-egress-binding.yaml
apiVersion: crd.nsx.vmware.com/v1alpha1
kind: SubnetConnectionBindingMap
metadata:
  name: vks-02-egress-binding
  namespace: wkld-03-proj-02
spec:
  subnetName: vks-02-egress-subnet
  targetSubnetSetName: vks-02-8f4wx
  vlanTrafficTag: 200
$ kubectl apply -f sup-egress-binding.yaml
subnetconnectionbindingmap.nsx.vmware.com/egress-binding-vks02 createdStep 4: Create the ExternalIPPool in VKS
Now switch contexts to your VKS cluster and create an ExternalIPPool that references the subnet CIDR and VLAN tag you configured in the Supervisor. The IP range must exclude the network address, gateway, and broadcast address.
$ vcf context use vks-02:vks-02Create the ExternalIPPool using the info from the subnet created earlier:
# vks-externalippool.yaml
apiVersion: crd.antrea.io/v1beta1
kind: ExternalIPPool
metadata:
  name: vks-02-egress-pool
spec:
  ipRanges:
  - start: 192.168.27.18
    end: 192.168.27.30
  subnetInfo:
    gateway: 192.168.27.17
    prefixLength: 28
    vlan: 200
  nodeSelector: {}
$ kubectl apply -f vks-externalippool.yaml
externalippool.crd.antrea.io/egress-ip-pool createdStep 5: Create the Egress Rule
The final step is creating an Egress CR that assigns the ExternalIPPool to a specific namespace. This ensures that all pods in that namespace use the dedicated egress IP when communicating with external systems.
# vks-egress.yaml
apiVersion: crd.antrea.io/v1beta1
kind: Egress
metadata:
  name: vks-02-egress
spec:
  appliedTo:
    namespaceSelector:
      matchLabels:
        kubernetes.io/metadata.name: vks-02
  externalIPPool: vks-02-egress-pool
$ kubectl apply -f vks-egress.yaml -n fah
egress.crd.antrea.io/app-egress createdVerification and Testing
Once everything is configured, verify that pods in your namespace are using the correct egress IP. In my environment, the pods must egress to hit the DNS server therefore let’s perform an nslookup for validation. The namespace I’m using has privileged execution permissions, you will need to modify your namespace in order to perform the following:
Check permissions on your namespaces:
$ kubectl get namespaces -o custom-columns="NAME:.metadata.name,ENFORCE:.metadata.labels.pod-security\.kubernetes\.io/enforce,WARN:.metadata.labels.pod-security\.kubernetes\.io/warn"Enable privileged execution:
$ kubectl label --overwrite ns fah pod-security.kubernetes.io/enforce=privileged$ kubectl run egress-test --image=busybox -n fah --restart=Never --rm -it -- nslookup www.broadcom.com 10.10.1.252
Server: 10.10.1.252
Address: 10.10.1.252:53
Non-authoritative answer:
www.broadcom.com canonical name = cdn.broadcom.com
cdn.broadcom.com canonical name = www.broadcom.com.cdn.cloudflare.net
Name: www.broadcom.com.cdn.cloudflare.net
Address: 172.64.150.145
Name: www.broadcom.com.cdn.cloudflare.net
Address: 104.18.37.111
pod "egress-test" deleted from fah namespaceThe nslookup process should succeed, confirming that egress is working correctly.
Troubleshooting Common Issues
If egress isn’t working as expected, check the following:
- VLAN conflicts: Ensure your VLAN ID is unique across all SubnetConnectionBindingMaps
- IP range overlaps: Verify your ExternalIPPool range doesn’t include network, gateway, or broadcast addresses
- SubnetSet mismatch: Confirm the targetSubnetSetName matches your cluster’s actual SubnetSet
- Egress CR status: Check the Egress resource status for any error messages
- Antrea agent logs: Review logs on cluster nodes for egress-related errors
Real-World Use Cases
This dedicated egress configuration becomes invaluable in several scenarios:
Third-party API integration: When external services require IP whitelisting, you can provide a specific egress IP per application rather than whitelisting your entire cluster’s IP range.
Compliance and audit requirements: Separate egress IPs for different namespaces make it easier to track which applications are communicating with external systems and establish clear network boundaries.
Multi-tenant environments: Different teams or customers can have dedicated egress paths, preventing traffic mixing and simplifying chargeback or usage tracking.
Looking Forward
The EgressSeparateSubnet feature combined with NSX VPC mode provides enterprise-grade network control for Kubernetes workloads. By following this process across the Supervisor and VKS contexts, you gain the ability to implement sophisticated egress policies that meet both technical and compliance requirements. As your environment grows, consider documenting your VLAN assignments and IP pool allocations to maintain consistency across multiple clusters and namespaces.
Special thanks to Claude (Anthropic) for assistance with content development and technical writing.

Leave a comment