Click Run workflow in GitHub, or trigger the same pipeline with an API call from the CLI, and get a fully configured VM out of VCF Automation. Tear it all down again the same way. Let’s get this pipeline flowing.
An example repo, including all files required for this implementation, is available at vcfa-terraform-example.
Why Automate VCFA Deployments?
Manually deploying infrastructure through any UI is tedious and error-prone. By using infrastructure as code and CI/CD pipelines, we gain:
- Version control of infrastructure definitions
- Repeatable, auditable deployments
- Easier rollback and state management
- Self-service GitHub-based triggering
Solution Overview
We leverage the following tools:
- GitHub Actions: for CI/CD automation
- Terraform: to define and deploy VCFA resources
- VCF Automation (VCFA): to manage vSphere infrastructure
- Self-hosted GitHub runner: to run workflows on-prem
- VCF Automation templates (blueprints in the API): for VM, and vApp, definitions in VCFA
Before You Start
Here’s what you need in place before the first run:
- A VCF 9 VM Apps organization. This example uses the
vmware/vraprovider, which covers VM Apps orgs (catalog items, templates, deployments). All Apps organizations use thevmware/vcfaprovider instead, which this post doesn’t cover. - A project and a released catalog item. By default the config deploys into a project named
Defaultand looks up a catalog item namedNSX Ubuntu Webserver (AWX). Both are Terraform variables now (project_nameandcatalog_item_name), so you can point them at your own. The template behind the catalog item has to accept five inputs:hostname,ipAddress,gateway,dns, andprefixLength. - A VCF Automation API token. The provider authenticates with a
refresh_token. In VCF Automation 9 that’s the API token you create under My Account > API Tokens in your VM Apps organization. It’s good for 90 days by default, so put a rotation reminder on your calendar. - Your organization name. The provider’s
organizationargument is required for VCF Automation. - A Linux VM for the self-hosted runner that can reach your VCF Automation endpoint, with Terraform installed. Use runner v2.327.1 or newer so it can run Node 24 actions. This VM also stores the state files (more on that later).
- Terraform and provider versions.
provider.tfrequires Terraform>= 1.2.0and pinsvmware/vrato~> 0.11.0(0.11.x).
I tested this on the self-hosted runner with Terraform 1.12.2 and the vmware/vra provider 0.11.1, against VCF Automation build 9.1.1-0200-25801570.
Repository Secrets
The connection details are real secrets. Add them under Settings > Secrets and variables > Actions > Secrets:
| Secret | Feeds | Notes |
|---|---|---|
VCFA_URL | TF_VAR_url | Your VCF Automation URL |
VCFA_REFRESH_TOKEN | TF_VAR_refresh_token | The API token from My Account > API Tokens |
VCFA_ORG | TF_VAR_organization | The VM Apps organization name |
VCFA_INSECURE | TF_VAR_insecure | true to skip TLS verification (lab only), otherwise false |
Repository Variables (Deployment Defaults)
These are optional defaults, used when a workflow input is left blank. Add them under Settings > Secrets and variables > Actions > Variables. The workflow reads each one from a repository variable first and then from a secret of the same name, so an older secrets-only setup keeps working. I’d still use variables, because GitHub masks secret values as *** in the logs, and that includes the hostname in the state file path.
| Variable | Feeds | Notes |
|---|---|---|
HOSTNAME | TF_VAR_hostname, DEPLOYMENT_NAME | Default when the hostname input is blank (lowercase only) |
IPADDRESS | TF_VAR_ipAddress | Default static IP |
GATEWAY | TF_VAR_gateway | Default gateway |
DNS | TF_VAR_dns | Always comes from here, since there’s no workflow input. Use a JSON string such as ["192.168.10.10"] |
PREFIXLENGTH | TF_VAR_prefixLength | Default prefix length, for example 24 |
Repo Structure
vcfa-terraform-example/
├── .github/
│   └── workflows/
│       └── deploy-vcfa.yml   # workflow_dispatch pipeline (apply/destroy)
├── tf/
│   ├── backend.tf            # empty local backend, path set at init
│   ├── main.tf               # project + catalog item lookups, vra_deployment
│   ├── provider.tf           # Terraform/provider versions, provider "vra"
│   └── variables.tf          # connection, project/catalog item, deployment inputs
├── .gitignore                # keeps .terraform/, state, crash logs, tfvars out of Git
├── LICENSE                   # MIT
└── README.md
The .gitignore is small but important: state files live on the runner and should never end up in Git, and *.tfvars files are ignored too, since they tend to collect secrets.
Provider and Authentication
Everything in this pipeline goes through tf/provider.tf:
terraform {
  required_version = ">= 1.2.0"
  required_providers {
    vra = {
      source  = "vmware/vra"
      version = "~> 0.11.0"
    }
  }
}

provider "vra" {
  url           = var.url
  refresh_token = var.refresh_token
  organization  = var.organization
  insecure      = var.insecure
}
There are no credentials anywhere in the repo. They take three hops from GitHub to the provider.
Hop 1: GitHub secrets. VCFA_URL, VCFA_REFRESH_TOKEN, VCFA_ORG, and VCFA_INSECURE live in the repository’s secrets.
Hop 2: Environment variables. The workflow maps each one to a TF_VAR_ environment variable for the job (you’ll see the full env block in the workflow section below).
Hop 3: Terraform variables. Terraform automatically picks up any TF_VAR_<name> environment variable as var.<name>, so these land in the variables at the top of tf/variables.tf, which feed the provider "vra" block:
variable "url" { type = string }
variable "refresh_token" { type = string }
variable "organization" { type = string }
variable "insecure" { type = bool }
GitHub masks secret values in the job logs, and nothing sensitive gets committed. Because insecure is a bool, the VCFA_INSECURE secret has to be the literal text true or false. Use false anywhere you have a CA-signed certificate.
A quick word on that version pin: ~> 0.11.0 is what I tested with, and the provider has moved well past it since. Newer releases changed how deployment inputs are sent (0.16.0 started sending them as strings, and 0.17.x changed drift detection and updates for array and object inputs), so re-test inputs like dns before you bump it.
The Terraform Configuration
tf/main.tf is short and sweet: two lookups and one resource.
data "vra_project" "default" {
  name = var.project_name
}

data "vra_catalog_item" "blueprint" {
  name = var.catalog_item_name
}
The data sources look up the project and the catalog item by name, so you never paste IDs around. The names come from two variables in tf/variables.tf:
variable "project_name" {
  description = "VCF Automation project to deploy into"
  type        = string
  default     = "Default"
}

variable "catalog_item_name" {
  description = "Catalog item (released VCF Automation template) to deploy"
  type        = string
  default     = "NSX Ubuntu Webserver (AWX)"
}
Change the defaults to match your environment, or set TF_VAR_project_name and TF_VAR_catalog_item_name without touching the code.
resource "vra_deployment" "vcfa_deployment" {
  name            = var.hostname # or a custom var like var.deployment_name
  description     = "TF Deployment into VCFA"
  project_id      = data.vra_project.default.id
  catalog_item_id = data.vra_catalog_item.blueprint.id

  inputs = {
    hostname     = var.hostname
    ipAddress    = var.ipAddress
    gateway      = var.gateway
    dns          = var.dns
    prefixLength = var.prefixLength
  }
}
The vra_deployment resource requests the catalog item in that project, the same way clicking Request in the catalog would. The deployment is named after the hostname, and the inputs map passes straight through to the template’s inputs, so the keys here have to match the input names in your template exactly.
The rest of tf/variables.tf declares those inputs:
variable "hostname" {
  description = "Hostname of the deployed VM"
  type        = string
}

variable "ipAddress" {
  description = "IP address of the deployed VM"
  type        = string
}

variable "gateway" {
  description = "Default gateway"
  type        = string
}

variable "dns" {
  description = "DNS server(s)"
  type        = string # This is string even though it *looks* like an array — it's a JSON-encoded string in Terraform vRA input
}

variable "prefixLength" {
  description = "Network prefix length (e.g. 24 for 255.255.255.0)"
  type        = number
}
Watch out for dns. Even if your template treats DNS as a list, it goes in as a string holding JSON, for example ["192.168.10.10"]. Store your DNS variable in that format.
The Workflow, Step by Step
All the logic lives in .github/workflows/deploy-vcfa.yml. Here’s what it does, top to bottom.
Trigger and Inputs
name: Apply/Destroy VCFA Template

on:
  workflow_dispatch:
    inputs:
      action:
        description: "Terraform action to run"
        required: true
        default: apply
        type: choice
        options:
          - apply
          - destroy
      hostname:
        description: "VM Hostname (blank = HOSTNAME variable/secret, which reuses one state file)"
        required: false
      ipAddress:
        description: "Static IP Address"
        required: false
      gateway:
        description: "Default Gateway"
        required: false
      prefixLength:
        description: "Subnet Prefix Length"
        required: false
The workflow only runs on demand through workflow_dispatch. You can trigger it from the Actions tab or the API, and nothing runs on a push. action is a dropdown with apply and destroy, and everything else is optional.
Job Setup and Concurrency
jobs:
  deploy:
    runs-on: self-hosted

    # One run at a time per deployment name, so two runs never write the same
    # state file. Secrets aren't available here, so a blank hostname with only a
    # HOSTNAME secret falls into one shared group (it also shares one state file).
    concurrency:
      group: vcfa-deploy-${{ inputs.hostname || vars.HOSTNAME || 'default-hostname' }}
      cancel-in-progress: false
runs-on: self-hosted sends the job to my runner VM inside the lab, which can actually reach VCF Automation. The concurrency group makes sure two runs for the same deployment name never write the same state file at the same time. With cancel-in-progress: false, a second run waits in line instead of cancelling the first, which is exactly what you want when the first one is halfway through a destroy.
One subtlety, called out in the comment: secrets aren’t available when GitHub evaluates the concurrency key, so the group only sees the input and the HOSTNAME repository variable. One more reason to use a variable for that default.
Environment: Input, Then Variable, Then Secret
    env:
      TF_VAR_url: ${{ secrets.VCFA_URL }}
      TF_VAR_refresh_token: ${{ secrets.VCFA_REFRESH_TOKEN }}
      TF_VAR_organization: ${{ secrets.VCFA_ORG }}
      TF_VAR_insecure: ${{ secrets.VCFA_INSECURE }}

      # Non-secret defaults: workflow input, then repository variable, then secret (existing setups).
      TF_VAR_hostname:     ${{ inputs.hostname     || vars.HOSTNAME     || secrets.HOSTNAME }}
      TF_VAR_ipAddress:    ${{ inputs.ipAddress    || vars.IPADDRESS    || secrets.IPADDRESS }}
      TF_VAR_gateway:      ${{ inputs.gateway      || vars.GATEWAY      || secrets.GATEWAY }}
      TF_VAR_dns:          ${{ vars.DNS            || secrets.DNS }}
      TF_VAR_prefixLength: ${{ inputs.prefixLength || vars.PREFIXLENGTH || secrets.PREFIXLENGTH }}

      DEPLOYMENT_NAME: ${{ inputs.hostname || vars.HOSTNAME || secrets.HOSTNAME }}
      TF_ACTION: ${{ inputs.action }}
The first four lines are the three-hop credentials from earlier. Below them, each deployment value uses || as a fallback chain: if you fill in an input, it wins. If you leave it blank, the repository variable is used, and if that’s empty too, the secret of the same name. DEPLOYMENT_NAME follows the same rule as the hostname, and it’s what keeps each deployment’s state separate. TF_ACTION carries the apply/destroy choice into the shell steps.
    defaults:
      run:
        working-directory: tf
Every run step executes from the tf/ folder.
Checkout and Hostname Validation
    steps:
      - name: Checkout repository
        uses: actions/checkout@v7

      - name: Validate hostname
        run: |
          if [ -z "$DEPLOYMENT_NAME" ]; then
            echo "::error::No hostname given. Set the 'hostname' input, or a HOSTNAME repository variable or secret."
            exit 1
          fi
          if ! [[ "$DEPLOYMENT_NAME" =~ ^[a-z0-9]([a-z0-9-]{0,61}[a-z0-9])?$ ]]; then
            echo "::error::Invalid hostname '$DEPLOYMENT_NAME'. Use 1-63 lowercase letters, digits, or hyphens, starting and ending with a letter or digit."
            exit 1
          fi
actions/checkout@v7 runs on Node 24, which matters now that GitHub has removed Node 20 from its runners. The validation step fails fast, before Terraform ever starts, if there’s no hostname at all or if it isn’t a valid DNS label: 1 to 63 characters, lowercase letters, digits, and hyphens, starting and ending with a letter or digit. Since the hostname ends up in a file path on the runner, this also keeps anything odd out of $HOME/tfstate/. Heads-up: uppercase hostnames are rejected, so Web01 needs to become web01.
Init with a Dynamic Backend
tf/backend.tf declares a local backend with no path:
# backend.tf
terraform {
  backend "local" {}
}
The path gets filled in at init time:
      - name: Terraform Init
        run: terraform init -backend-config="path=$HOME/tfstate/${DEPLOYMENT_NAME}.tfstate"
Each hostname gets its own state file in ~/tfstate/ on the runner, like ~/tfstate/web01.tfstate. Run destroy with the same hostname later, and Terraform picks up the exact state file it created.
Validate, Plan, Then Apply or Destroy
      - name: Terraform Validate
        run: terraform validate

      - name: Terraform Plan
        run: |
          if [ "$TF_ACTION" = "destroy" ]; then
            terraform plan -destroy
          else
            terraform plan
          fi

      - name: Terraform Apply
        if: ${{ inputs.action == 'apply' }}
        run: terraform apply -auto-approve

      - name: Terraform Destroy
        if: ${{ inputs.action == 'destroy' }}
        run: terraform destroy -auto-approve

      - name: Terraform Show State
        run: terraform show
Every run validates and plans, and the plan matches the action: a destroy run shows terraform plan -destroy, so the log tells you what’s about to go away instead of a confusing “to add.” Then one of the two if: conditions matches the action input, so you get either an apply or a destroy, never both. terraform show at the end prints the resulting state to the job log, which is a quick way to confirm what VCF Automation sent back (or that it’s empty after a destroy).
You might notice there’s no step that uploads logs as artifacts. That’s on purpose: on a public repo, artifacts are readable by anyone, and Terraform debug logs can contain credentials, so the job log plus terraform show is all the evidence I keep.
Self-Hosted Runner
The runner is a small Linux VM in the lab that listens for jobs from GitHub. Register it from Settings > Actions > Runners > New self-hosted runner and follow GitHub’s download and config.sh steps. Then install it as a service so it survives reboots:
cd ~/actions-runner
sudo ./svc.sh install
sudo ./svc.sh start
svc.sh install creates and enables the systemd unit, and svc.sh start starts it, so you don’t need separate systemctl enable or systemctl start commands. To check on it:
sudo ./svc.sh status
# or
sudo systemctl status actions.runner.<OWNER>-<REPO>.<RUNNER_NAME>.service
When a job doesn’t get picked up, the logs usually explain why:
sudo journalctl -u actions.runner.<OWNER>-<REPO>.<RUNNER_NAME>.service -f
Need more capacity? You can run several runners on one VM by giving each its own directory and a unique name. Remember they’ll all share the same ~/tfstate/ folder.
One security note: GitHub recommends self-hosted runners only for private repositories. This workflow only runs on workflow_dispatch, which limits exposure, but if you fork it as a public repo, restrict which workflows and repositories can use the runner.
AWX + Ansible Integration
In this example, the VCF Automation template hands the new VM to AWX, which finishes configuring it once cloud-init is done. The job I use is a simple starter you can copy and grow:
- Waits for cloud-init’s apt work to release the dpkg lock
- Patches the OS with a full
distupgrade - Installs nginx and enables it at boot
- Installs
kubectlfrom snap and verifies it - Reboots the VM to apply the updates
The hostname, static IP, and the ansible user with its SSH key are handled earlier by cloud-init, so AWX can log in as soon as the VM is up.
How the Template Hands Off to AWX
No custom scripting is needed for the handoff. VCF Automation has a built-in AWX (Ansible Tower) integration, and the template uses it through a Cloud.Ansible.Tower resource. The host binding ties the AWX run to the new VM, and account is the name of the AWX integration in VCF Automation:
  Cloud_Ansible_Tower_1:
    type: Cloud.Ansible.Tower
    properties:
      host: ${resource.Cloud_vSphere_Machine_1.*}  # bind AWX to the new VM
      account: awx                                  # name of the AWX integration in VCF Automation
      templates:
        provision:
          - name: nginx web server install          # exact AWX job template name
      hostVariables:
        ansible_host: ${input.ipAddress}
        ansible_user: ansible
      groups:
        - test
For AWX to log in, cloud-init creates the ansible user and drops in its public key. The key comes from a VCF Automation secret, so it never lives in the template:
      cloudConfig: |
        #cloud-config
        users:
          - name: ansible
            groups: sudo
            shell: /bin/bash
            sudo: ALL=(ALL) NOPASSWD:ALL
            ssh_authorized_keys:
              - ${secret.awx-user-publicKey}
        hostname: ${input.hostname}
        fqdn: ${input.hostname}.example.com
On the AWX side, VCF Automation adds each new VM to the job template’s inventory as a host, and the job connects with a Machine (SSH) credential for that ansible user. No extra vars or survey are needed, because everything the play needs arrives as host variables.
Using DHCP instead of a static IP? Point ansible_host at ${resource.Cloud_vSphere_Machine_1.address}, and AWX picks up whatever address the VM was given. Either way, the name under templates.provision has to match the AWX job template exactly.
Waiting for cloud-init
The host binding only makes AWX wait until the VM exists, not until cloud-init is finished. If both try to run apt at once, the play fails on a locked dpkg database. So the first task waits for the lock to clear:
    - name: Wait for any other apt/dpkg process to finish
      shell: |
        while fuser /var/lib/dpkg/lock-frontend >/dev/null 2>&1; do
          echo "Waiting for apt lock to be released..."; sleep 5;
        done
      changed_when: false
A simple loop, but it saves a lot of red in the job output. If you want a stricter gate, cloud-init status --wait waits for all of cloud-init, not just its apt work.
The Playbook
The AWX job template nginx web server install runs ubuntu-install-webserver.yml, a single play with become: true. After the wait task, it patches, installs, and reboots:
    - name: Upgrade all packages
      apt:
        upgrade: dist
        update_cache: yes
        cache_valid_time: 3600

    - name: Install nginx (latest version)
      apt:
        name: nginx
        state: latest
        update_cache: yes

    - name: Ensure nginx is running
      service:
        name: nginx
        state: started
        enabled: yes

    - name: Ensure snapd is installed
      apt:
        name: snapd
        state: present
        update_cache: yes

    - name: Wait for snap seed (one-time init)
      command: snap wait system seed
      changed_when: false

    - name: Install kubectl via snap (classic)
      command: snap install kubectl --classic
      args:
        creates: /snap/bin/kubectl

    - name: Verify kubectl
      command: kubectl version --client
      register: kubectl_ver
      changed_when: false

    - name: Reboot the VM after updates
      reboot:
        msg: "Rebooting the VM to apply updates"
        connect_timeout: 5
        reboot_timeout: 600
        pre_reboot_delay: 5
        post_reboot_delay: 30
        test_command: whoami
Two small touches keep reruns clean: changed_when: false on the read-only tasks and creates: on the snap install. In my lab a full run takes about five minutes, most of it the OS upgrade and the reboot.
[Screenshot: AWX job output showing a successful run against the new VM]
Run It
Time to push the button.
- Add the secrets and variables. In the repo, go to Settings > Secrets and variables > Actions. Create the four secrets on the Secrets tab and any defaults you want on the Variables tab, using the tables in Before You Start.


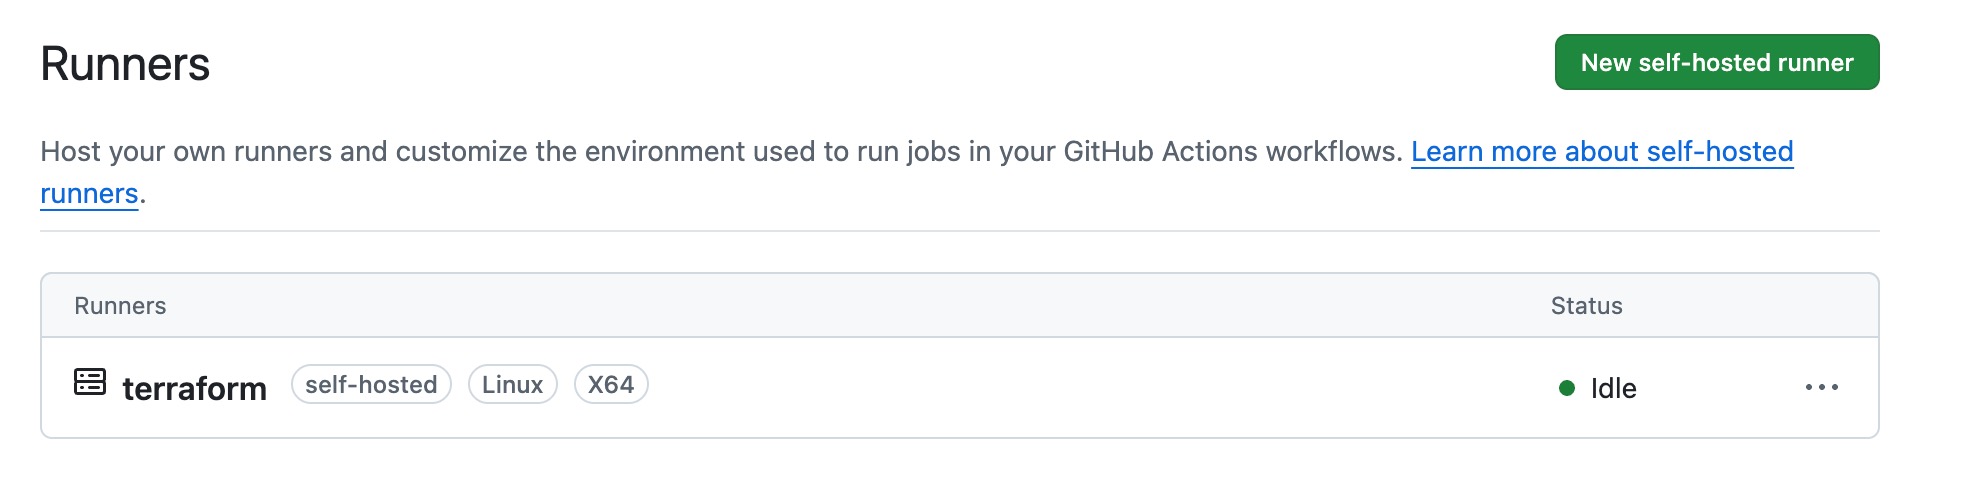
- Check the runner. Under Settings > Actions > Runners, your runner should show as Idle.
- Run the workflow. Open the Actions tab, select Apply/Destroy VCFA Template, and click Run workflow. Leave
actionset toapply, fill in a lowercase hostname, the IP, gateway, and prefix length (or leave them blank to use your defaults), and click the green button.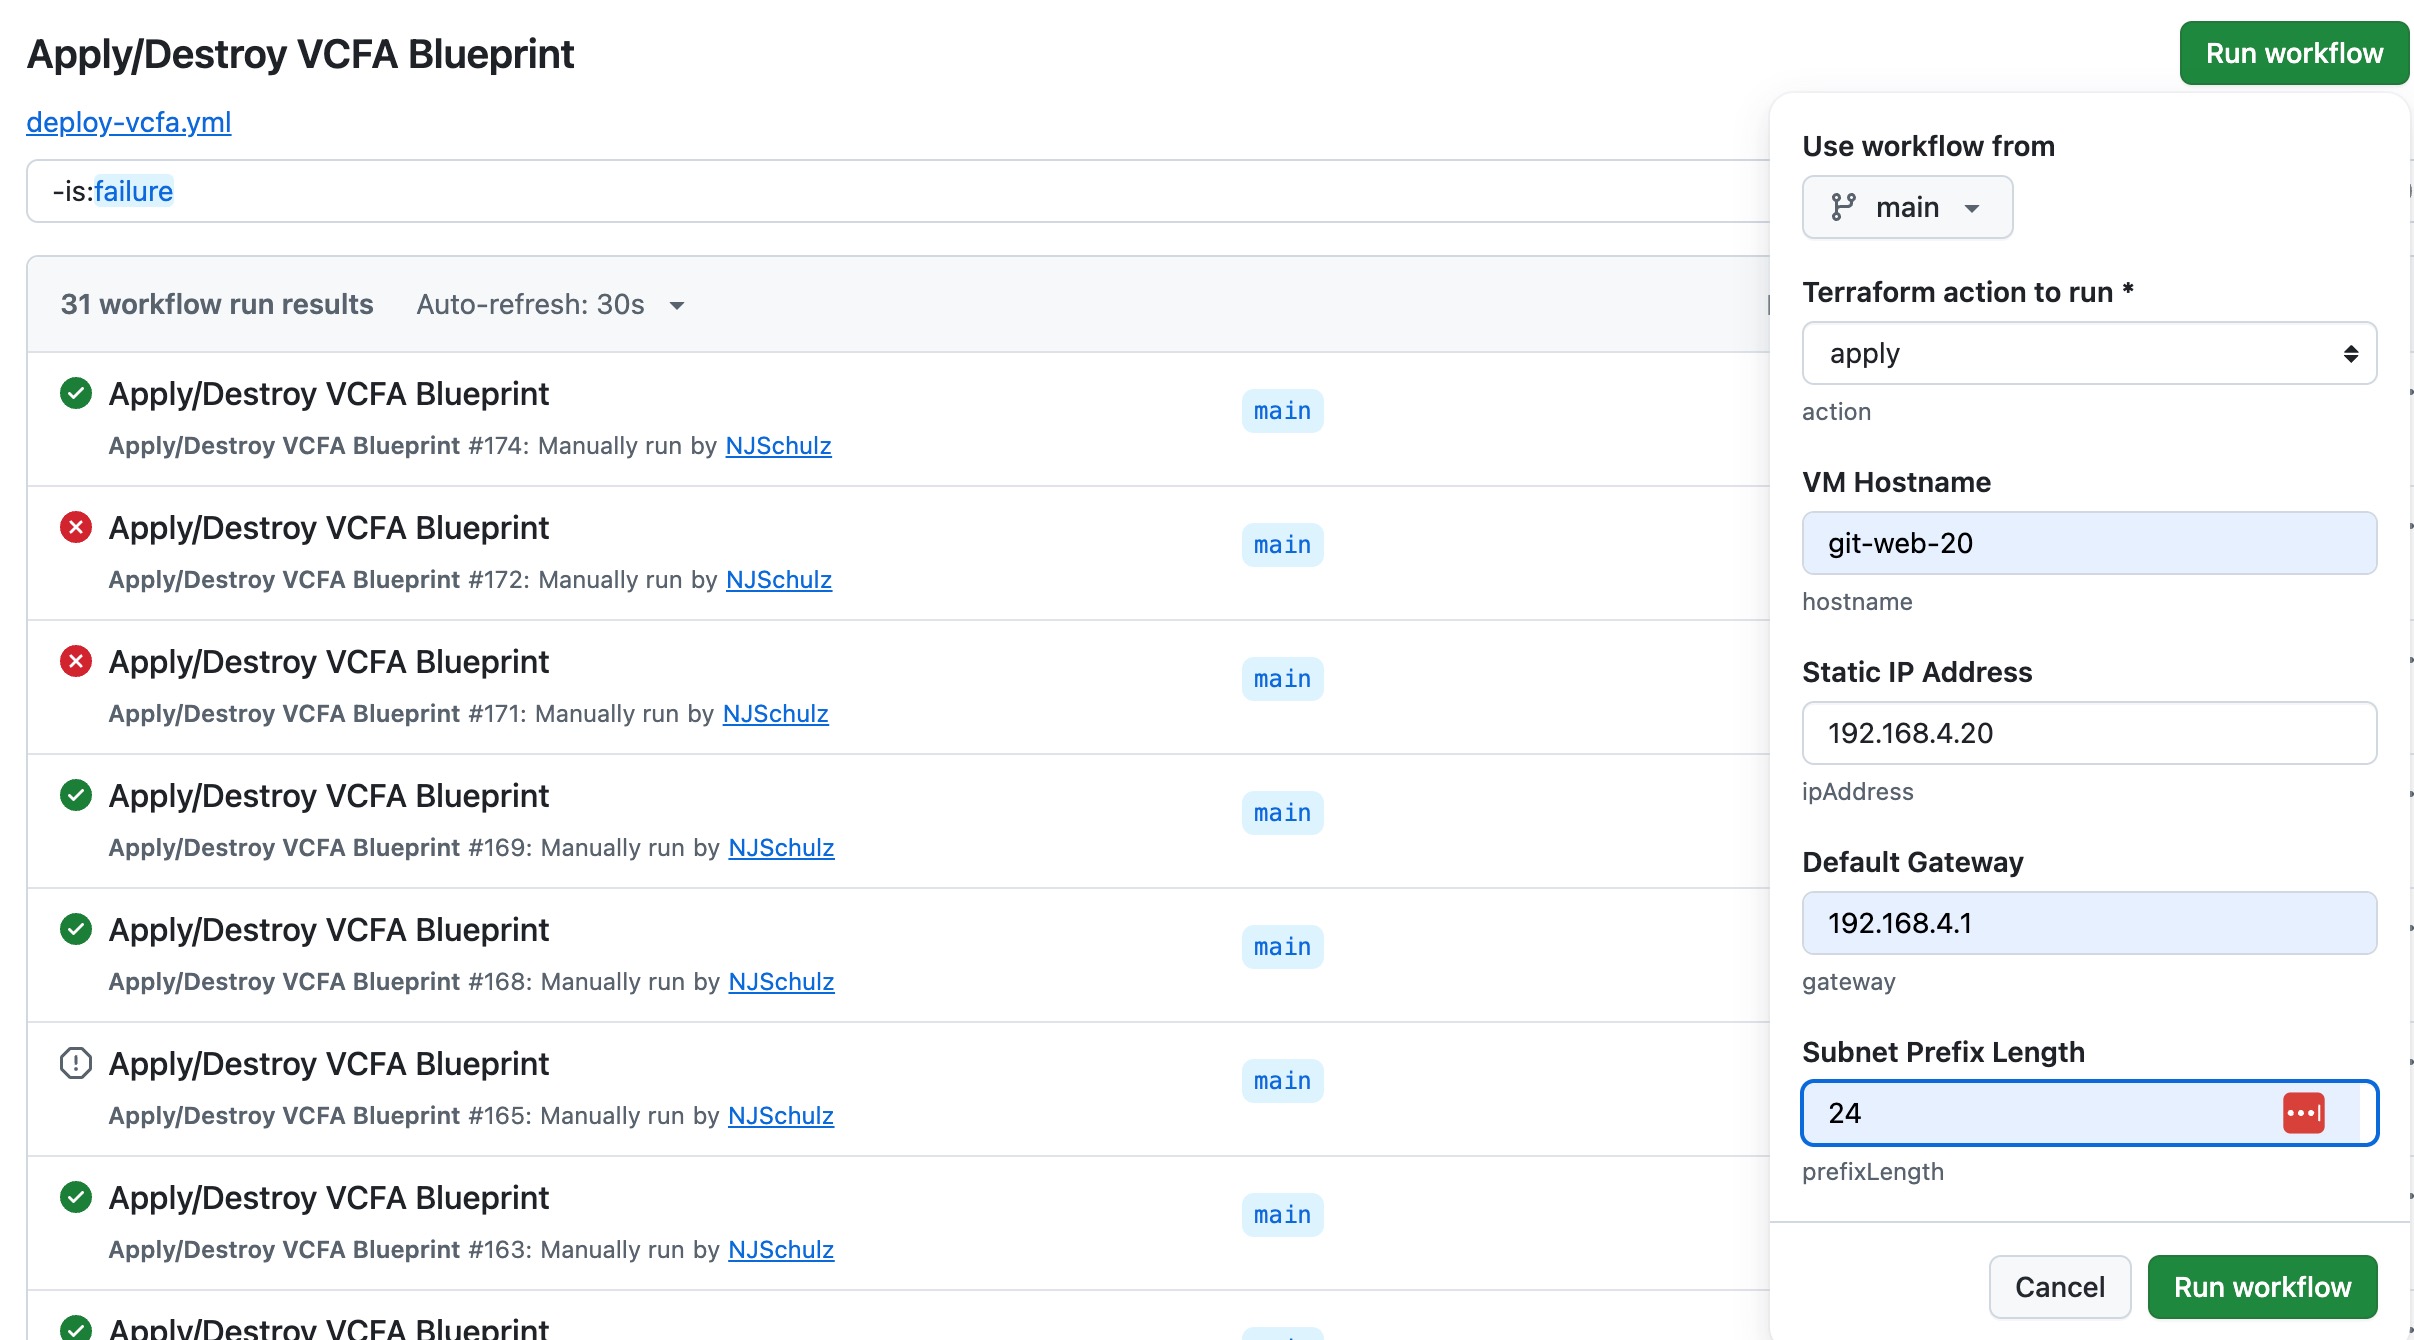
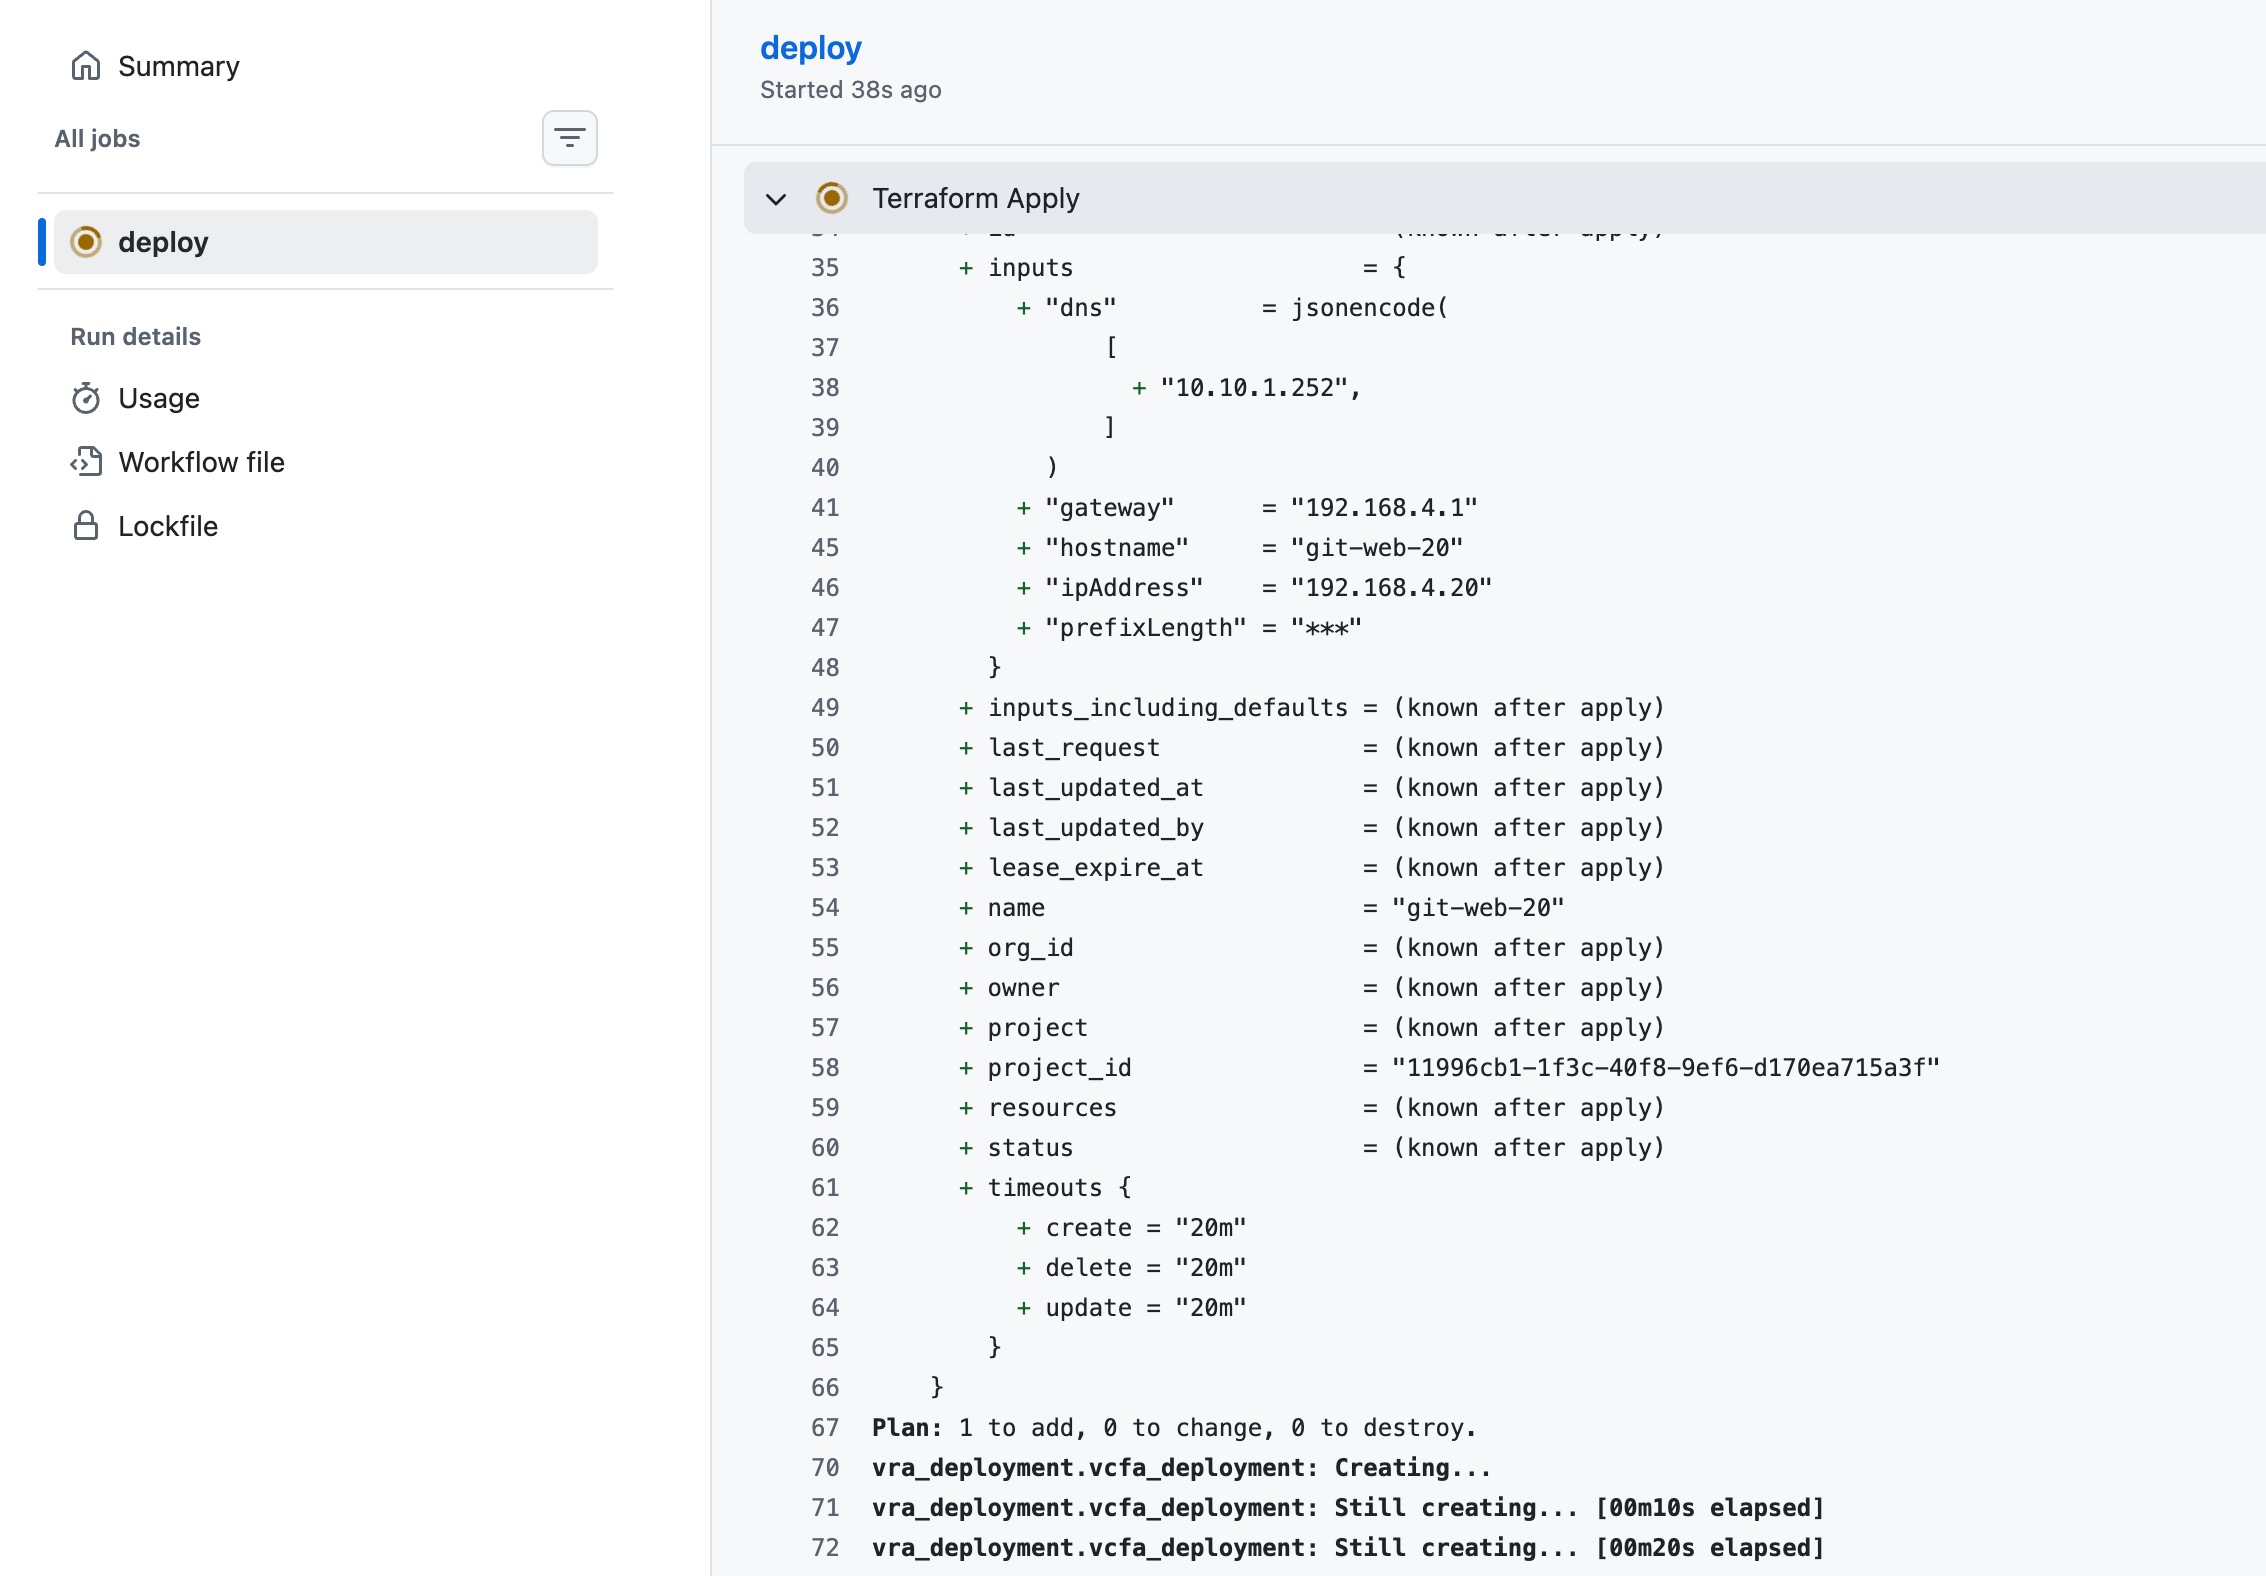
- Watch it run. The job log walks through hostname validation, init, validate, plan, and apply. While apply waits, switch over to VCF Automation.
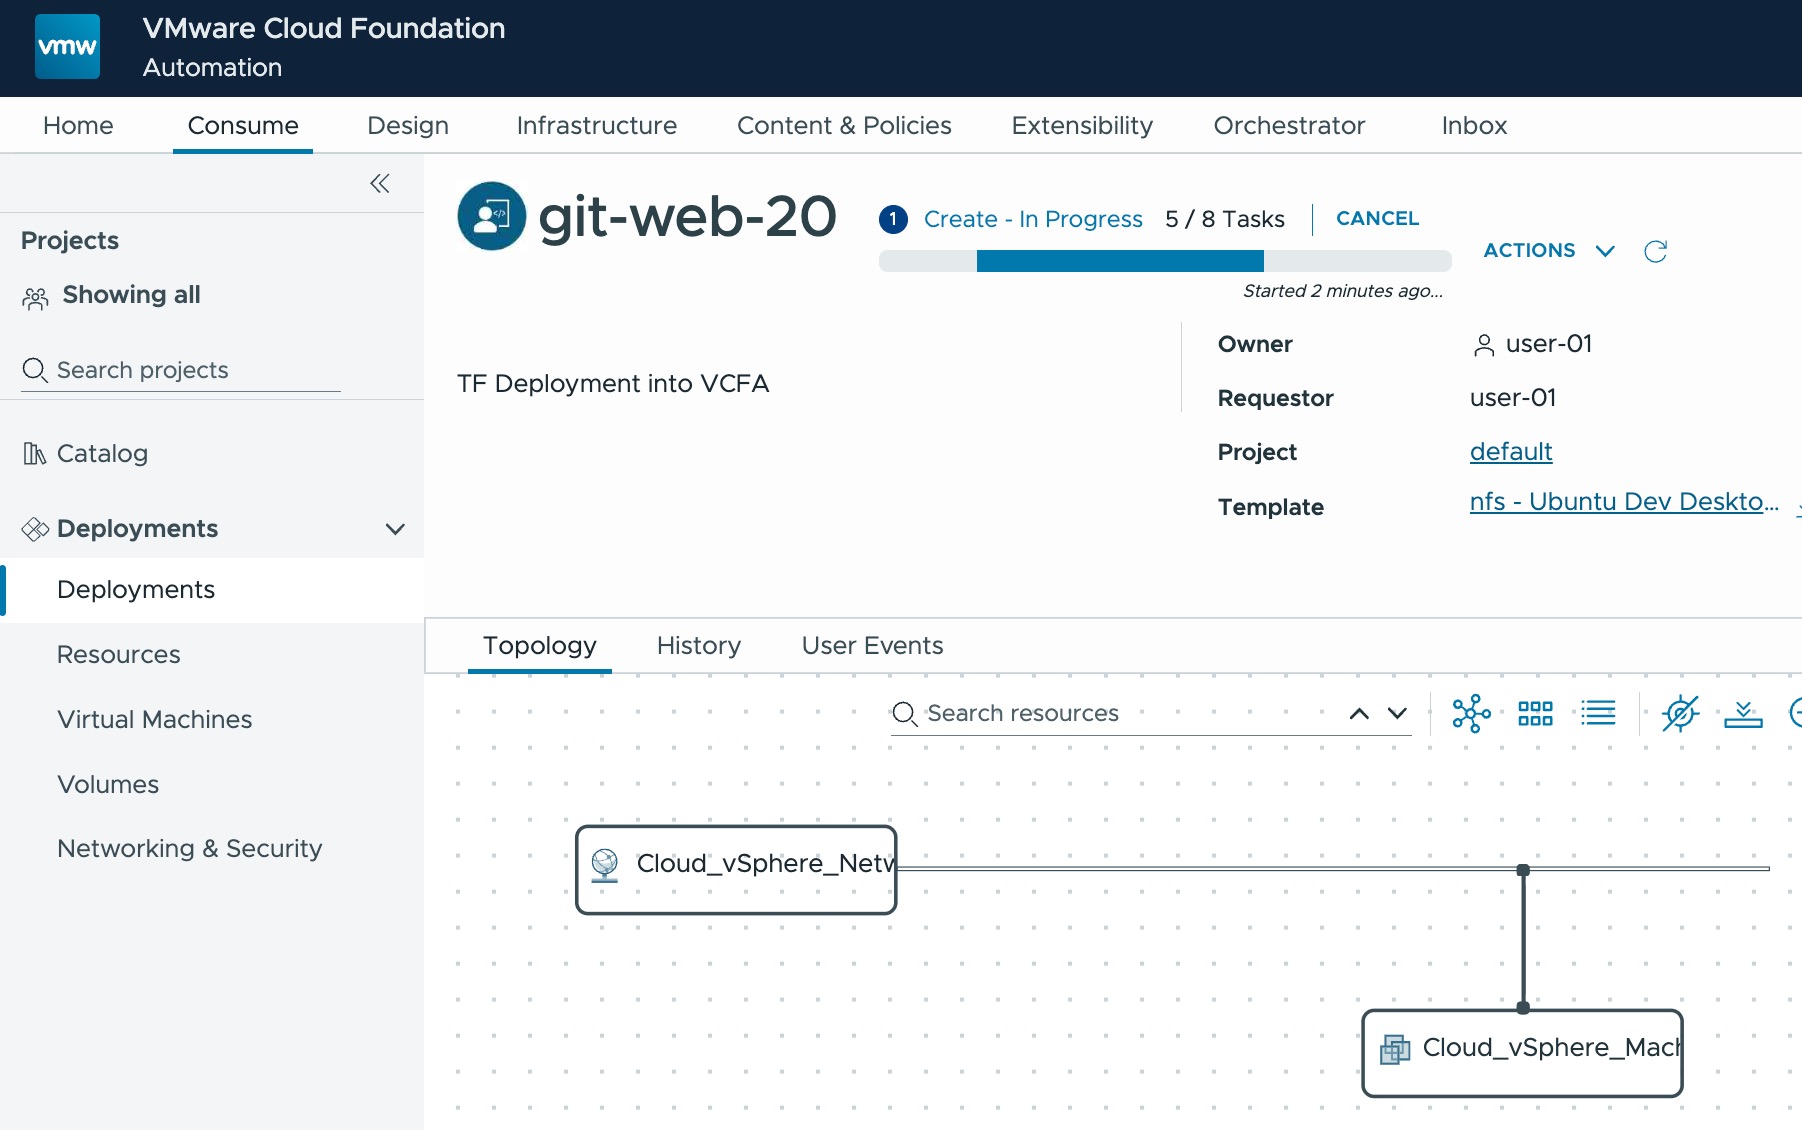
- Watch it in VCF Automation. A new deployment named after your hostname shows up under Deployments in the project and moves through provisioning. When it finishes, AWX takes over the configuration.
- Tear it down. Run the workflow again with
actionset todestroyand the same hostname. The plan shows what’s about to be removed, Terraform loads that hostname’s state file and deletes the deployment, andterraform showcomes back empty.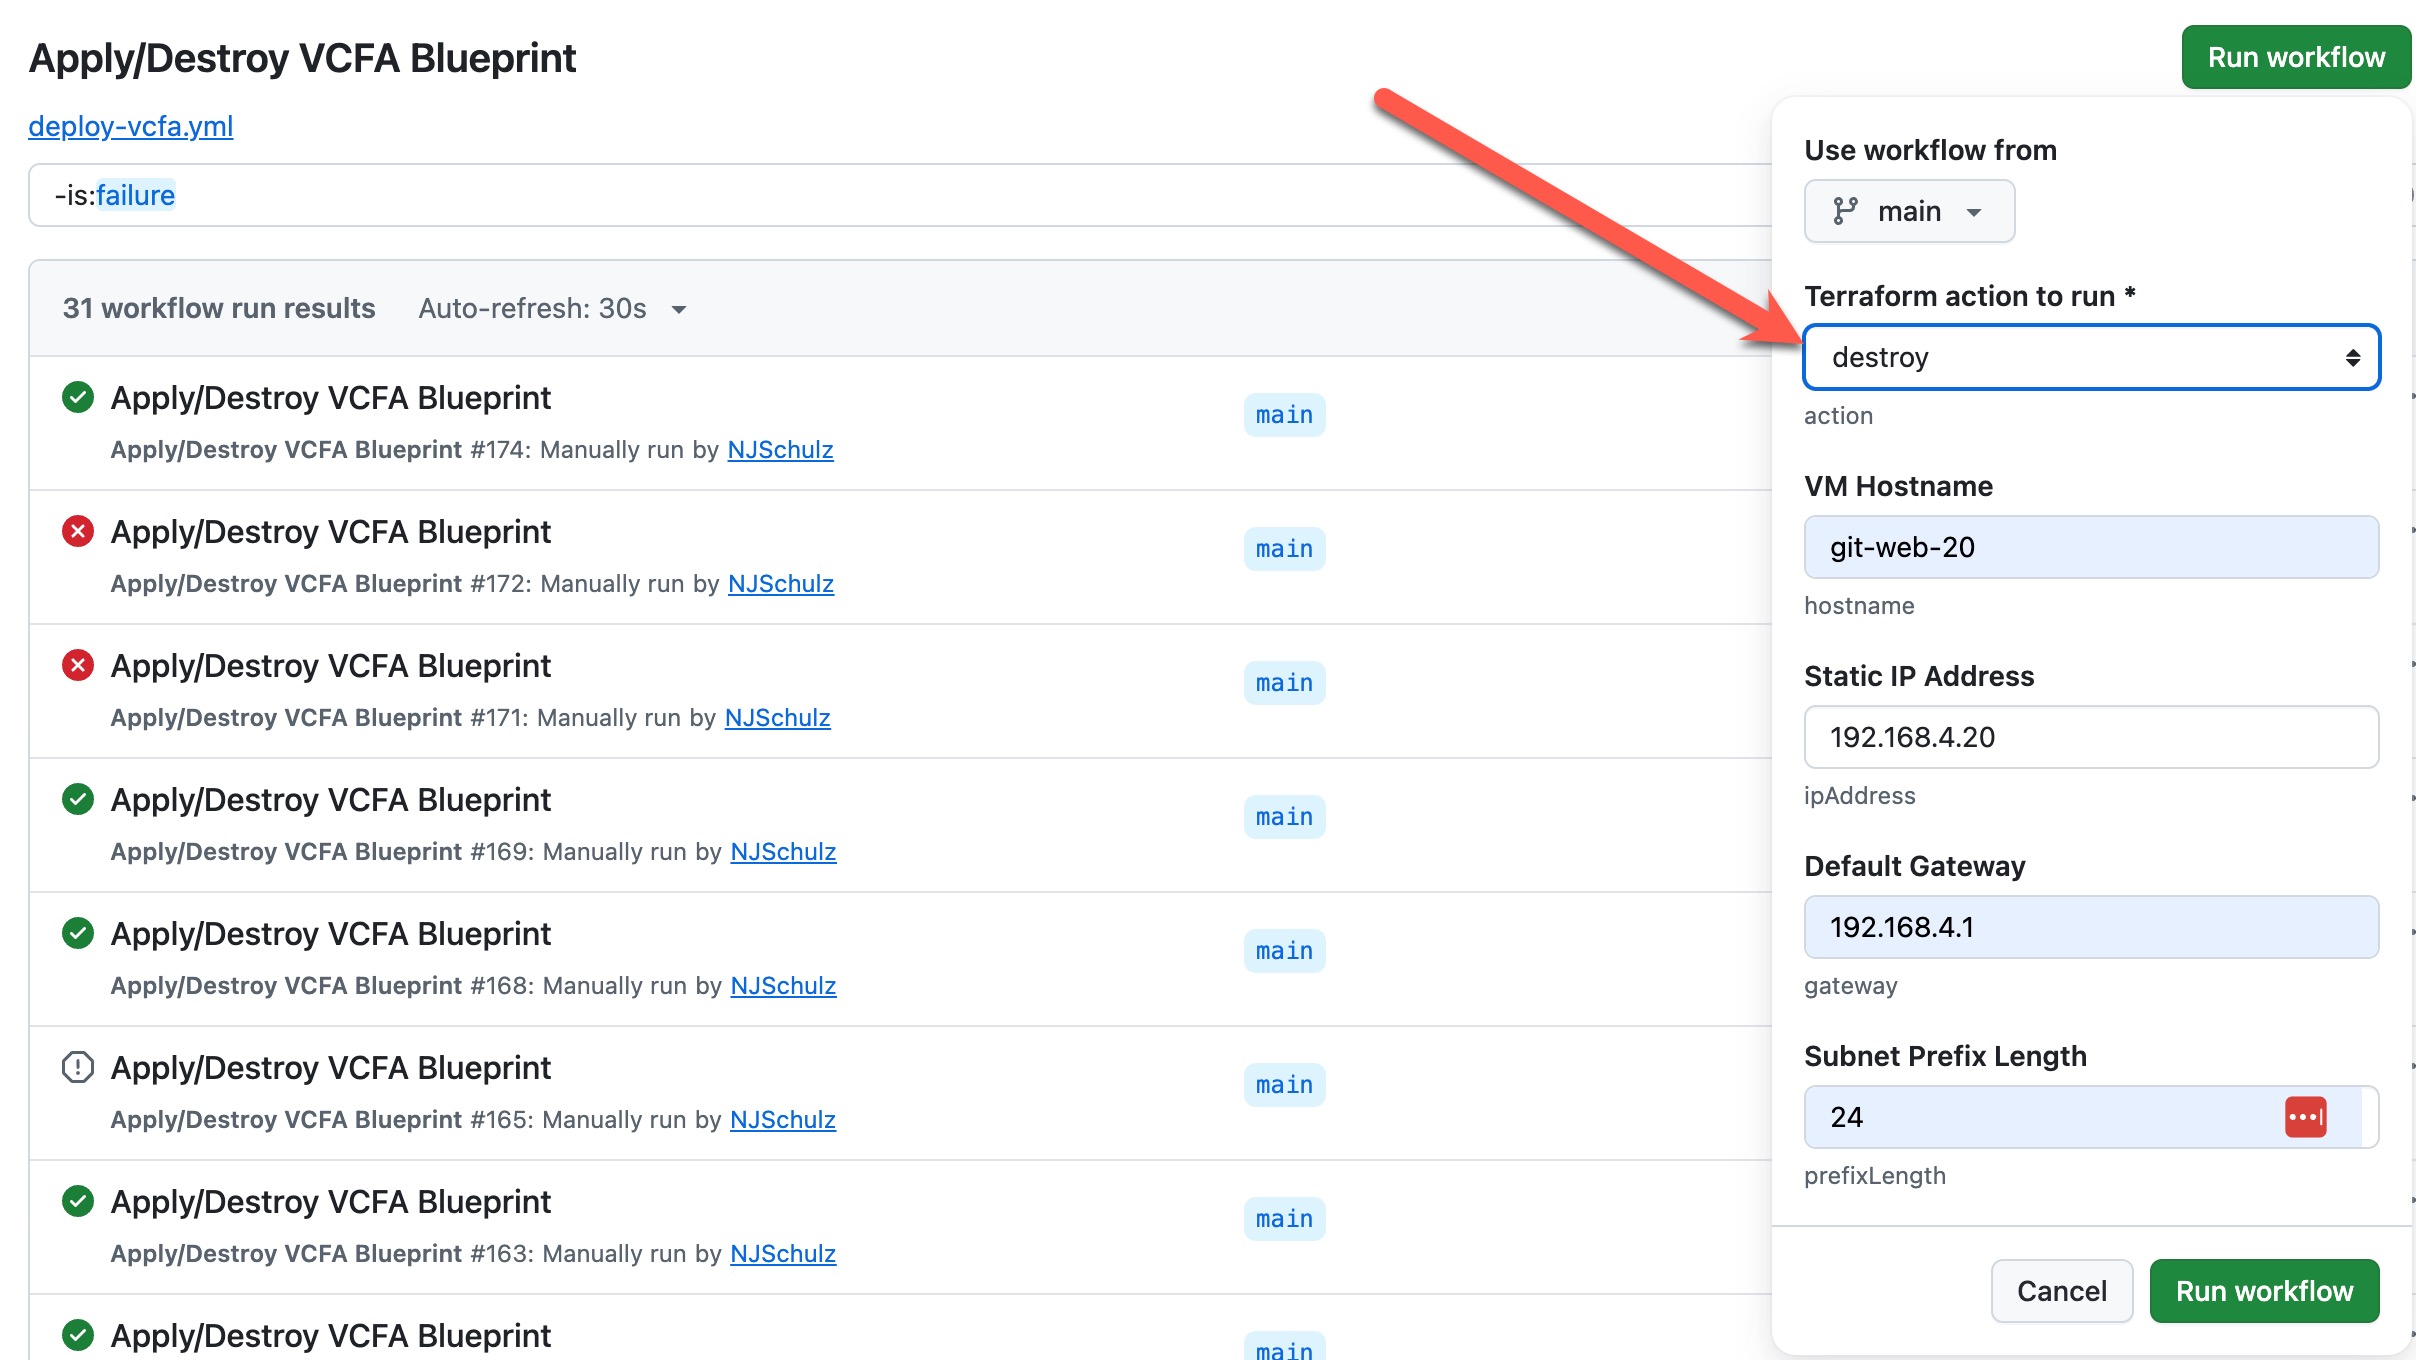

Triggering Deployments via API
A deployment can be triggered directly by using the GitHub API:
curl -X POST \
  -H "Authorization: Bearer <TOKEN>" \
  -H "Accept: application/vnd.github+json" \
  https://api.github.com/repos/<username>/<repo>/actions/workflows/deploy-vcfa.yml/dispatches \
  -d '{
    "ref": "main",
    "inputs": {
      "action": "<apply or destroy>",
      "hostname": "<hostname>",
      "ipAddress": "<ipAddress>",
      "gateway": "<gateway>",
      "prefixLength": "<prefixLength>"
    }
  }'
The token needs Actions: Read and write on the repo. Prefer the GitHub CLI? This does the same thing, here for a destroy:
gh workflow run deploy-vcfa.yml --repo NJSchulz/vcfa-terraform-example \
  -f action=destroy -f hostname=web01
Inputs travel as strings either way, and the same rules apply: lowercase hostname, and anything you leave out falls back to your repository variables.
A Word on State
Local state keeps this example simple, and the workflow now has two guardrails built in: the concurrency group queues runs for the same deployment name, and the hostname check keeps bad names out of the state path. A few trade-offs are still worth knowing about:
- The state lives on one runner. Every
.tfstatefile sits in~/tfstate/on that VM, in plaintext, and the workflow doesn’t back it up. If you lose or rebuild the runner without a backup, Terraform no longer knows what it deployed. The deployments keep running in VCF Automation, but you’d have to delete them by hand orterraform importthem. At a minimum, back up that folder. - Hostnames still have to be unique. State is keyed on
DEPLOYMENT_NAME, which is the hostname. The concurrency group stops two runs from colliding at the same moment, but it can’t stop you from reusing a name: runapplywith a hostname that’s still deployed, and Terraform updates that deployment instead of creating a second one. Leave the hostname blank, and every run falls back to the sameHOSTNAMEdefault and the same state file. - When to move to a remote backend. Once more than one person or more than one runner VM is involved, or the deployments matter more than lab toys, move to a remote backend with locking. An S3-compatible bucket (such as MinIO in the lab) or HCP Terraform both work. The per-deployment idea carries over: swap the
path=for a per-hostname key or workspace.
Lessons Learned
- Use dynamic backend state paths to avoid collisions. Naming the state after the hostname gives every deployment its own file, so you can tear down any VM without touching the others, and the concurrency group keeps two runs from stepping on the same file.
- Inputs over hard-coding. Pairing
workflow_dispatchinputs with repository-variable defaults gives one workflow a “quick lab default” mode and a “custom build” mode. Even the project and catalog item names are variables now. - Variables for config, secrets for secrets. Putting hostnames and IPs in secrets turns your logs into a wall of
***. Keep secrets for the things that are actually secret. - Validate early. A five-line hostname check fails in seconds, instead of halfway through a VCF Automation request. Just remember it wants lowercase.
- Make the plan match the action.
plan -destroyon destroy runs means the log shows what you’re actually about to do. - Match input names exactly. The keys in the Terraform
inputsmap have to match the template’s input names character for character,ipAddressandprefixLengthincluded. - JSON strings for list inputs.
dnsgoes in as a JSON-encoded string, not a Terraform list. - Ensure cloud-init is complete before Ansible provisioning begins.
- Run
apt update && upgradecarefully. It may delay Ansible tasks. - Pin your provider, then revisit it.
~> 0.11.0keeps runs predictable, but the provider has moved on, so re-test before you bump it. The same goes for actions:checkout@v4stopped working once Node 20 left the runners. - Keep the runner close, and keep an eye on it. A self-hosted runner inside the lab means VCF Automation never has to be exposed to the internet. Always monitor your self-hosted runners with
systemctland logs.
Conclusion
By combining GitHub Actions, Terraform, and VCFA, we’ve built a scalable and automated way to deploy workloads into vSphere with VCF Automation templates (blueprints in the API). The result is better consistency, faster deployments, and true infrastructure as code.
Grab the vcfa-terraform-example repo, point it at your own catalog item, and take it for a spin.
What’s next? A pipeline is only as good as the image it deploys. In Patch the Gold, Skip the Rush I build hardened VCF Automation golden images with Packer. Next up, I’ll wire the two together, so fresh images and fresh deployments come off the same assembly line.
Leave a Reply